Pencil drawing by PencilHB |
D E U T S C H | E N G L I S H |
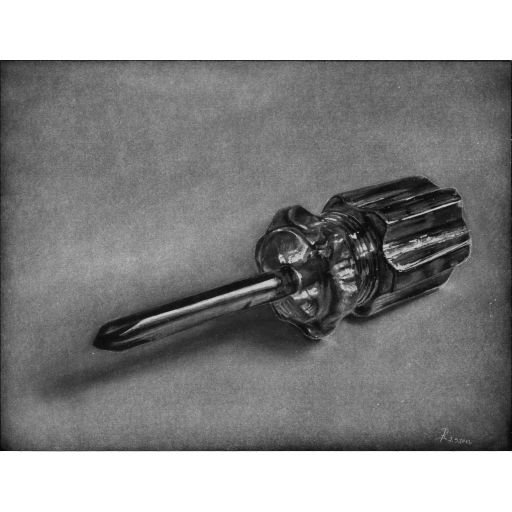
Common heros - Screwdriver
|
Share this drawing |
|
|

September.07.2013 DIN-A4 11.7 x 8.3 inch
(drawing of a photo-negative)
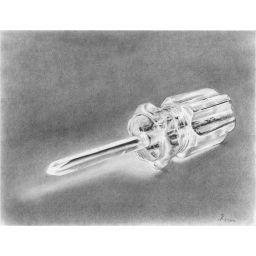
(digital invertation of the 'negative-drawing')
Description
Terrace - After 20 years in rain and weather the wood terrace-railing needs to be repaired. I have to scrape off the old color, grind the wood and paint it with new color. The railing consists of 10 individual sections each with 6 Phillips-screws. I could do it with the simple hand screwdriver, but I have a modern-battery-screwdriver!
I've used the simple hand screwdriver countless times. It's just a nondescript tool - but very important.
Terrace - 6 screws are done - no problem with the battery-screwdriver
Open the roller shutter box -> with the simple hand screwdriver
Terrace - 14 screws are done - I'm thankfull for the cordless screwdriver
Remove an outlet -> with the simple hand screwdriver
Terrace - 22 screws are done - ha, soon this will be done
Repair the music-box -> with the simple hand screwdriver
Terrace - 30 screws are done - it works so fast and I feel like a great craftsmen
Open the Iron -> with the simple hand screwdriver
Terrace - 37 screws are done - the power of the cordless screwdriver is impressive
Disassemble the percolator -> with the simple hand screwdriver
Terrace - 43 screws are done - I hope the neighbours are watching - it works fantastic
Install a plug-in card for my PC -> with the simple hand screwdriver
Terrace - 49 screws are done - nearly there
Disassemble my bike circuit -> with the simple hand screwdriver
Terrace - 52 screws are done - the noise is changing, what's wrong? in idle-loop, the screwdriver is moving, but he has no power anymore - the battery is empty - charging time 2 hours!
Disassemble the wood railing around the terrace -> with the simple hand screwdriver!!!
About the drawing
To try something new, I have drawn the negative of a photo (during the creation I saw the negativ on my computer).
It was not planned, but when it was finished, I asked myself: how actually does my drawing look like, if I would invert it on my computer?
You can say: I created a negative with my pencil and digitally developed a photo.
top
Steps
top/left predrawing (pencil)
top/right blackshading (pencil)
bottom/left softshading rough (graphite-powder with fingers)
bottom/right softshading smooth (graphit-powder with folded paper)
bottom hardshading (pencil)
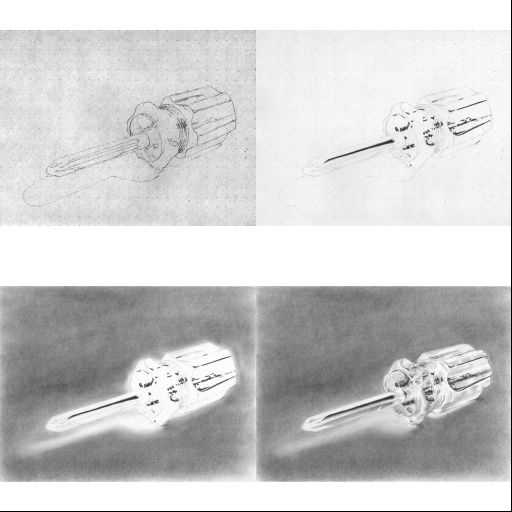
final drawing
Tools/Material
| Paper | normal printer-papier (DIN-A4...A6) normal sketchbook paper (DIN-A3) |
| Pencil HB | for pre drawing, fine lines, area-darkening and graphite-powder |
| Eraser | (2 x 2 x 0.6 cm) for area-lightening |
| Eraser | (small - at the end of a pencil) to smear graphite-powder |
| Sandpaper | to produce graphite-powder with the HB-pencil |
| Paper handkerchief | to smear graphite-powder or for blurring (wide areas) |
| Finger | to smear graphite-powder or for blurring (middle areas) |
| Pen with bicycle tube | to smear graphite-powder or for blurring (small areas) |
| Cardboard | to smear graphite-powder or for blurring (tiny areas) |
| Eraser-template | simple construction with a gap (1 x 30mm) |
| Eraser-template | simple construction with a gap (1 x 2mm) |
| Extra papers | to protect areas |
Version March.15.2015
Copyright (C) 2014 by SEA
Software-Entwicklung Aichinger