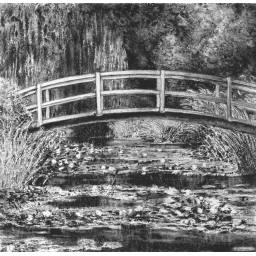
Pencil drawing by PencilHB |
D E U T S C H | E N G L I S H |
Famous painting - Monet
|
Share this drawing |
|
|

April.30.2014 DIN-A3 16.5 x 11.7 inch
Description
About the original painting
Artits | Claude Monet (18401926) |
Title | 'The Japanese Bridge' |
Date | 1899 |
Period | Impressionism/Naturalism/Abstraction |
Technology | Oil on canvas |
Dimensions | 92.7 x 73.7 cm (36 1/2 x 29 in.) |
Astonishing
When the drawing was done, I started a search for the intent-link to the original painting I used.
Again I was confused: there are a lot of lily pond-versions, including the Japanese bridge.
With that, doubt and nearly panic came on me I asked myself if I ever had an original Monet painting as a starting point.
After some search, slowly an explanation was growing: Monet has painted a whole series of the water lily pond. Somewhere I read: 13 paintings.
However, this series was only the prelude to a larger work. The last 30 years of his life, Monet worked on motifs from his water garden. Monet created 250 paintings of this garden - he was apparently obsessed by the subject.
About the artist
Monet first worked on realistic paintings, then turned to impressionism and after that developed (in his later years) naturalistic / abstract paintings.
Monet did not start impressionism, but he gave the name to this art with his painting 'Impression Sunrise'.
Particularly interesting are his last active years, which also includes 'The Japanese Bridge'. He mainly painted his water garden, but there was nearly no interest in the public. Until the 1980s, a distinction was made between the 'early work' and the 'late work'. The ' late work ' was seen in a negative way.
Now Monet's paintings are worth several millions of dollars...
About the drawing
The original was painted with very rough shapes and the artist mainly worked on the color effect.
To add more depth effect to my drawing, I sharpened some forms (especially the bridge) to get more distance to the background.
In this picture I tried a new approach: I used no pre-drawing, but the three color levels black/gray/white. It seems to be very effective.
top
Steps
(I did not create a pre drawing because of the amount of small details)
1 Black/gray/white 1.step
2 Black/gray/white 2.step
3 Black/gray/white 3.step
4 Details (third part)
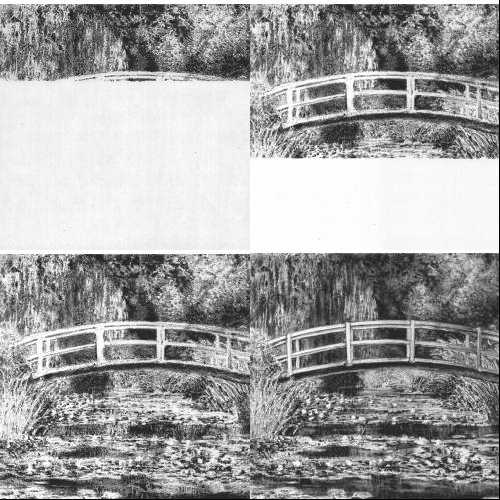
final drawing
Tools/Material
| Paper | normal printer-papier (DIN-A4...A6) normal sketchbook paper (DIN-A3) |
| Pencil HB | for pre drawing, fine lines, area-darkening and graphite-powder |
| Eraser | (2 x 2 x 0.6 cm) for area-lightening |
| Eraser | (small - at the end of a pencil) to smear graphite-powder |
| Sandpaper | to produce graphite-powder with the HB-pencil |
| Paper handkerchief | to smear graphite-powder or for blurring (wide areas) |
| Finger | to smear graphite-powder or for blurring (middle areas) |
| Pen with bicycle tube | to smear graphite-powder or for blurring (small areas) |
| Cardboard | to smear graphite-powder or for blurring (tiny areas) |
| Eraser-template | simple construction with a gap (1 x 30mm) |
| Eraser-template | simple construction with a gap (1 x 2mm) |
| Extra papers | to protect areas |
Version March.15.2015
Copyright (C) 2014 by SEA
Software-Entwicklung Aichinger